-
Shop
- Start Here
- Best Sellers
- What's New
- Brands
- Activated Probiotics
- Bioclinic Naturals
- Biogaia
- BiotiQuest
- Bodybio
- Cellcore
- FIQ
- Flordis
- Gelpro
- Kefirko
- Low D
- Masontops
- MedLab
- Melbourne Hot Sauce
- Metabolic Maintenance
- Microbiome Labs
- Mito Wellness
- Mother Dirt
- Nourishme Organics
- Preventa
- Provenir
- Pure Encapsulations
- Qenda
- Quicksilver Scientific
- Researched Nutritionals
- Thorne
- VSL3
- Vivomixx
- Bundles
- Allergic Rhinitis
- Anti-Ageing
- Australian Made
- Beauty
- Biohacking
- Bone Broth
- Books
- Candida
- Cheese
- Children
- Cleaning
- Collagen
- Colostrum
- Constipation
- Detox
- Deuterium Depleted Water
- Diarrhea
- Dietary Fibre
- Digestive Enzymes
- Dysbiosis
- Erectile Dysfunction
- Fat Loss
- Fermentation
- Fermented Vegetable
- Fine Foods
- Garden
- Gift Cards
- Gut Health
- Hair Loss
- Heavy Metals
- H pylori
- IBS/ IBD
- Immune Health
- Kefir
- Kombucha
- Leaky Gut
- Low FODMAP
- Medicinal Mushrooms
- Menopause
- Mental Health
- Microbiome
- Microbiome Consultation
- Miso, Koji, Natto
- Mitochondrial Health
- Mould
- Multivitamins
- Oral Health
- Organic
- Paleo/ Carnivore
- Pantry
- Parasites
- Pet Health
- Postbiotics
- Prebiotics
- Prepping
- Probiotics
- Red Light Therapy
- Reflux
- Rheumatoid Arthritis
- Root Cause Protocol
- Second Fermentation
- SIBO
- Skin Care
- Sleep
- Sourdough
- Sports Nutrition
- Sprouting
- Stress
- Supplements
- Tempeh
- Testosterone
- Toilet Stool
- Travel
- Vegan
- Weight Loss
- Yoghurt
- Zeolite
-
Shop
- Shop All
- Start Here
- Best Sellers
- By Product
- Australian Made
- Books
- Carnivore
- Cheese
- Collagen
- Colostrum
- Deuterium Depleted Water
- Dietary Fibre
- Digestive Enzymes
- Fermentation Accessories
- Fermented Vegetables
- Fine Foods
- Gift Cards
- Kefir
- Kombucha
- L reuteri
- Microbiome
- Miso, Koji, Natto
- Mushrooms
- Natural Extracts
- Organic Tea
- Postbiotics
- Prebiotics
- Probiotics
- Second Fermentation
- Sourdough
- Sports Nutrition
- Sprouting
- Starter Cultures
- Tempeh
- Yoghurt
- Zeolite
- By Brands
- Home & Beauty
- My Rewards
- My Orders
-
Learn
- Podcast
- Videos
- Recipes
- Support Group
- Beginners Start Here
- Fermentation Workshop
- Ultimate Guides Series
- Second Fermentation
- How to Make:
- Milk Kefir
- Water Kefir
- Coconut Milk Kefir
- Coconut Water Kefir
- Almond Milk Kefir
- Kombucha
- Jun Kombucha
- Viili
- Filmjolk
- Second Fermentation
- Dried Milk Kefir Grains
- Dried Water Kefir Grains
- Koji Rice
- White Miso
- Tempeh
- Probiotic Yoghurt
- Fermented Vegetable
- Vegan Coconut Yogurt
- Sprouts
- Natto
- Sourdough Levain
- Apple Cider Vinegar
- Sour Cream
- Fermented Buttermilk
- Cultured Butter
- L reuteri Yoghurt
- SIBO Yoghurt
- L gasseri Yoghurt
- Rhamnosus Yoghurt
- Tofu
- S boulardii Sparkling Soda
- What is Kefir
- What is Kombucha
- DDW Dilution Calculator
- Reviews
- About us
- Blog
- Podcast
- Contact Us
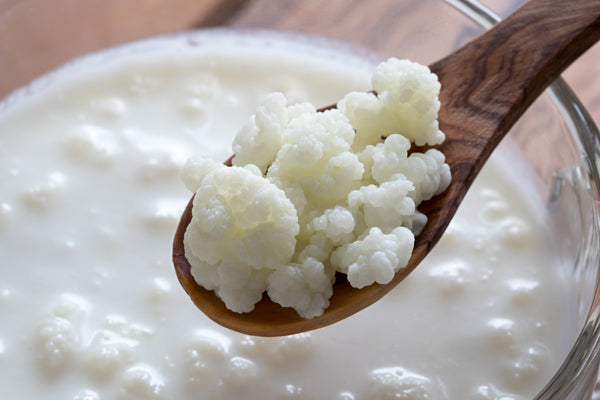
How To Make Milk Kefir
Ingredients
• 5g Organic Milk Kefir Grains
• 250ml of milk (we recommend organic, goat or jersey cow milk like A2 milk)
Optional extra ingredients
• 15g of milk kefir growth premix or 5 g of pure colostrum powder
You will also need a glass jar or a Kefirko Kefir maker (available on our website) for fermenting
• 250ml of milk (we recommend organic, goat or jersey cow milk like A2 milk)
Optional extra ingredients
• 15g of milk kefir growth premix or 5 g of pure colostrum powder
You will also need a glass jar or a Kefirko Kefir maker (available on our website) for fermenting
Instructions
#Start fermenting as soon as you received your grains. It takes a few batches for grains to acclimatise to your environment and consistency is the key to success.
Acclimatisation Step for first 3 batches Only:
1. Pour 125 ml of milk into a jar. If you are adding the growth premix or colostrum, you can add these ingredients at this point and mix well.
3. Add the 5 g of milk kefir grains. Loosely close lid.
4. Leave on the counter out of the direct sunlight or in a cupboard (preferably at 21 to 30 degrees celsius) for 12 to 48 hours (in hot weather, if ferments faster) - taste it as you go to get a feel for what 1 day milk kefir and 2 days milk kefir tastes like. The longer you leave to ferment, the more tart and more separated the kefir milk will be.
The ideal kefir should smell yeasty, taste slightly tart and just starts to separate to curds and whey.
5. Shake the bottle regularly during fermentation ( a good way to remember is every time you walk pass)*
6. After 12 to 48 hours (depending on your tastes), strain the kefir milk through a mesh strainer (or the in-built strainer if you have a Kefirko kefir maker), pouring the milk kefir into another container. If using a strainer, it helps to push the kefir milk through by stirring with a wooden spoon to leave only the milk grains behind.
Ongoing Steps After Acclimatisation phase has been completed:
1. Pour 250 ml of milk into a jar. If you are adding the growth premix or colostrum, you can add these ingredients at this point and mix well.
3. Add the 5 to 10 g of milk kefir grains. Loose cover jar with lid. If using a kefir maker leave lid slightly open.
**To keep alcohol as low as possible, ferment with kefir maker lid slightly open
4. Leave on the counter out of the direct sunlight or in a cupboard (preferably at 20 to 30 degrees celsius) for 12 to 48 hours (in hot weather, if ferments faster) - taste it as you go to get a feel for what 1 day milk kefir and 2 days milk kefir tastes like. The longer you leave to ferment, the more tart and more separated the kefir milk will be.
The ideal kefir should smell yeasty, taste slightly tart and just starts to separate to curds and whey.
5. Shake the bottle regularly during fermentation ( a good way to remember is every time you walk pass)*
6. After 12 to 48 hours (depending on your tastes), strain the milk kefir through a mesh strainer (or the in-built strainer if you have a Kefirko kefir maker), pouring the kefir milk into another container. If using a strainer, it helps to push the milk kefir through by stirring with a wooden spoon to leave only the milk grains behind
7. You may drink the kefir as is, or as per below, you may further ripen the kefir (see below).
8. To make a new batch of kefir, add these retrieved grains to fresh milk and repeat the process.
9. Bottle and store your kefir milk refrigerated.
10. You may also chose to second ferment as per instructions here to improve to flavour, texture and nutritive value.
*Shaking the fermenting kefir prevents the formation of yeasts and acetobacter colonies from forming on the surface. If colonies form they will appear as a light-brown wavy film. Skim this off, discard the film and use the kefir.
Ripened Kefir (optional)
Once you’ve strained out the kefir grains, you may choose to ripen kefir at room temperature for a day or two prior to consuming it. Ripening will increase some of the B group vitamins. As the kefir ripens, the thick creamy kefir floats above the watery whey. Shake or stir to blend the ingredients. Once it has ripened, refrigerate it.
Dosage
We recommend starting with a tablespoon and working up to consuming one cup per day.
Storage
When you are not fermenting, milk kefir grains need to be kept refrigerated by placing in fresh milk for up to 2 week in fridge. Milk kefir grains can also be frozen for up to 2 years by first mixing with milk powder and sealing in a zip lock bag. Please note that the grains coming out of cold storage will take a few batches before returning to original potency.
Prepared Milk kefir is best consumed with 2 weeks.
**Advisory Statement
All fermented foods may contain trace amounts of alcohol. If fermented foods are being prepared for children, breastfeeding mothers, or pregnant women please seek medical advice from a trained medical practitioner before consuming these products.
To keep alcohol as low as possible, make sure that:
- in step 3 the kefir maker/ jar was slightly open
- consume within 24 hours as alcohol content will increase over time in refrigerated storage
Let customers speak for us
This has been a life changer. I’ve been taking it daily for two weeks now and have seen massive improve especially after a bad flare up. Thank you 🤗
vivien y.

VSL#3 Sachets 30 x 4.4g 132g - WE RECOMMEND TO SELECT EXPRESS POST FOR THIS ITEM
Easy to make and yummy
Love the taste and simplicity to prepare the kefir
B E.

Organic Milk Kefir Grains 5g + Recipe E-Book
Great sunfibre
This is way cheaper than other brands of sunfibre. It doesn’t taste bad, easy to drink in a glass of water. Great and low FODMAP.
Kat I.

500g - Partially Hydrolysed Guar Gum (PHGG) - Sunfiber (LOW FODMAP)
Garry
Excellent
Garry R.

Large Kefirko Kefir Maker Mega Kit (Kefir Maker + Packet of Fresh Kefir Grains + Premix)
i'm so excited
I was a bit worried, the grains were in transit one week and then I thought it's too cold for fermentation as it's cold now in the house, at night around 15 degrees. But I went ahead with it, starting with three batches in 125ml of A2 milk. First batch wasn't good, but second was already drinkable. Now I started with 250ml. I'm so excited and can't wait for grains to multiply so I can have more and make cheese.
Eva T.

Kefirko Complete Kefir Cheese Making Kit
MyReuteri Starter Culture 20 Billion CFU 30 caps
I keep using L Reuteri capsules for more than 2years. I make yogurt and it is fenomenal help with digestion and sleep. No more bloating and good sleep!
Zofia

MyReuteri Starter Culture 20 Billion CFU per gram 30 caps
Kefir
What a wonderful product and so easy to use, a joy to be able to make your own Kefir as well, the only problem I had was that the Kefirko bottle is too small when we buy a 1 litre of milk so we have to buy a larger 1.3 litre bottel the we don't have to worry about it over flowing during the fermentation process. Other than that it's great not only making your own but also saving money. Thanks a lot, great work. Adrian & Helen
Adrian M.

Kefirko Kefir Maker Mega Kit (Kefir Maker + Packet of Fresh Kefir Grains + Premix)
I bought this as fibre for my cats to help remove creatine build up from kidney issues. Apparently Acacia Fibre works well with cats.
Shizeekwa

Organic Prebiotic Acacia Fibre (FODMAP FRIENDLY) 200g
Made a great yogurt
I used coconut cream, fermented for 36 hours at 43deg. The yoghurt was creamy and thick. I use Kuzu to thicken my yoghurt when I heat the coconut cream
JN

BiotiQuest Simple Slumber Starter Culture 30 caps
A gutful
After a bad, months long patch with IBS, I got onto this product. Within a week or two my bloating and pain decreased noticeably. Currently onto my second box. Worth every dollar!
Jules D.
VSL#3 Sachets 30 x 4.4g 132g - WE RECOMMEND TO SELECT EXPRESS POST FOR THIS ITEM
Pure Allulose
Thank you for your Pure Allulose which I have been using for all our cooking & baking needs, it's so wonderful to have such a product capable of all it's sweetness & usage, we don't miss the normal sugars anymore.
Adrian M.

Pure Allulose Powder
Pure Probiotic Yoghurt Starter
Love this product. The jar lasts me 7 days and easy to make in your yoghurt maker. I can add fruit and I know nothing else is added
Other than culture. Also so good not to use those store bought yoghurt
In plastic tubs. Definitely recommend. Thankyou for a great product
Suzanne M.

Pure Organic Probiotic Yoghurt Starter Culture — 3 × 1g Sachets

⭐⭐⭐⭐⭐ Excellent Quality Sprouting Seeds
Excellent quality sprouting seeds with a great germination rate. Fresh, organic, and easy to grow. Looking forward to enjoying the nutritional benefits of home-grown broccoli sprouts. Highly recommended!
Anonymous

Organic Nutrigenomic Broccoli Sprouting Seeds 100g
Product as described with quick delivery
Jennie

Raw Organic Vegan Water Kefir Grains 15g + Recipe E-Book